02 Ways to enable Dynamic Lock in Windows 10 to lock computer. When you are working on your PC and have to leave PC for a while, to shut down PC is not possible and people want auto lock PC. To keep safe and secure your system is also very important. Automatic Dynamic lock is an important feature and essential security aspect for any type of Windows PC. All users must enable screen lock in their system to prevent any unauthorized activity in windows system. There are many ways to enable screen lock in windows 10 system. But one new feature of Windows 10 which has newly introduced by Microsoft which is known as Dynamic Lock.
How to Enable Dynamic Lock in Windows 10
There are two ways to enable Dynamic Lock in Windows 10. The first way is through Registry Editor and second one is through Windows Setting. Here, in this article, we will discuss about both the methods one by one.
Ways-1 : Through Registry Editor Enable Dynamic Lock in Windows 10
We may enable dynamic lock through Registry Editor. Follow these steps: –
- Go to the search option.
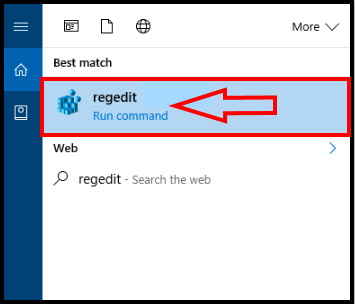
- Type regedit under the typing field.
- Search items will appear on your screen
- Here, select the best match regedit Run command.
- A new UAC prompt will appear on your screen.
- Make a click on Yes to proceed ahead further.
- Now, under the Registry Editor, go to the following key.
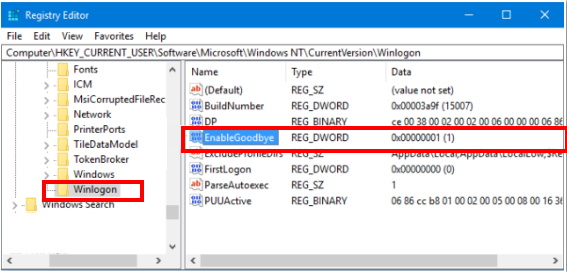
HKEY_CURRENT_USER\Software\Microsoft\Windows NT\CurrentVersion\Winlogon
- Under the registry editor, move to the right side of page.
- Here, find out a DWORD with a name EnableGoodbye.
Note – There may be a possibility of non-existence of such DWORD, then what can we do? But don’t worry, its so simple. You should follow these steps: –
- Perform a right-click on Winlogon key from the right side of menu list.
- Here, select 32-bit DWORD from the appeared pop up menu list.
- Change the name of this DWORD as EnableGoodbye.
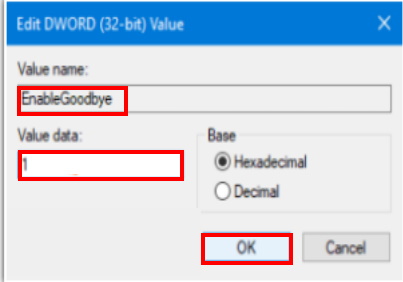
- Then, make a double-click on EnableGoodbye DWORD.
- Under the value data, put 1 as its value.
- Finally, click on Ok Button.
In later stage, if you want to disable Dynamic lock in your Windows 10 PC, you should put the value 0 in place of 1 under data value. The dynamic lock will disable automatic after putting the value as 0.
Ways-2 : Through Windows Setting
It is the another method to enable dynamic lock in your system. It is the most simple method you must apply this method. Follow these steps: –
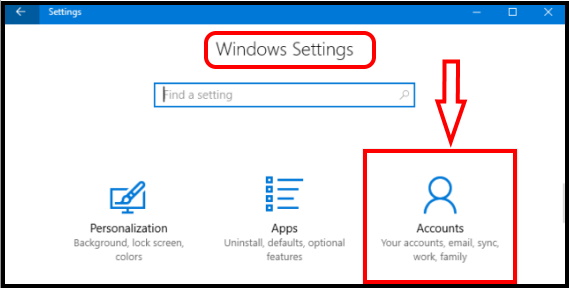
- Open Windows Setting by pressing Win logo + I hotkeys conjointly.
- Here you should select the option Accounts category.
- Under setting option, select the Sign-in options from the left sidebar.
- Now, find out the setting Dynamic Lock from the right pane.
- By default, Dynamic Lock is turned Off.
- So, pull the slider towards the right to use Dynamic Lock in Windows 10 and turn it On.
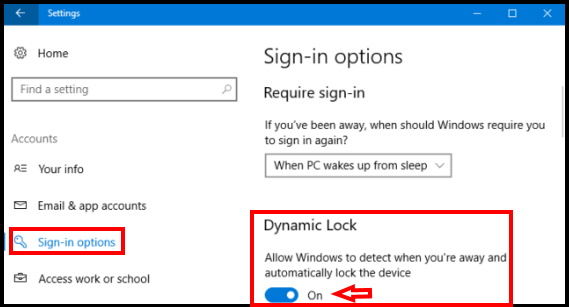
Now onwards, the Operating System will automatically lock your device approximately after 10 to 15 minutes of your leaving it.
Remarks : You should apply the second method. Because through registry editor, it may be at risk due to any wrong entry. I suggest you to prefer second option. It will be better.
Thanx…
