How to Fix Steam Error Code 130 failed to load Web page in Windows 11 and Windows 10. Steam is a popular and interesting gaming platform. Steam App let the users not only buy and playing games, but users can also chat with another participants online through this app. Similar to other gaming platform, Steam app also having some error code. Steam Error Code 130 with quoted message Failed to load web page (Unknown error). The Steam error code appears while users trying to load a web page and Steam Client fails.
The following are the main culprit of Steam Error Code 130: –
- Slow Internet connection
- Any third party software
- Corrupted file system
- Incorrect IP address
- DNS Cache
How to Fix Steam Error Code 130 failed to load Web page in Windows PC
Here are the various workarounds through which you can easily get rid of this error code and also got familiar with Steam Gaming App for Windows PC.
Ways-1: Restart Steam Gaming App
- Follow the exit process and Close the Steam App.
- Right click on Start Button and choose Task Manager.
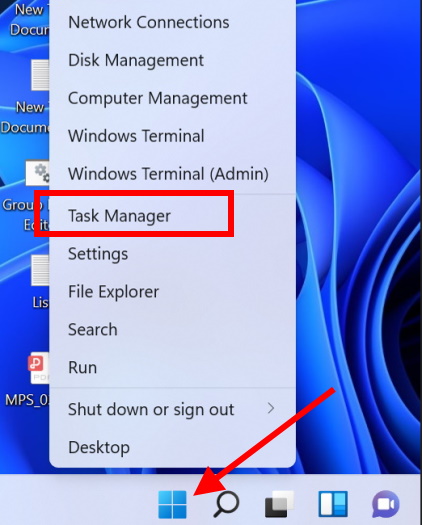
- In Task Manager window, click on Process tab from the top menu bar.
- Navigate the Steam app running process.
- Right click on it and choose End Task.
- Once the process is completely finished, relaunch Steam App.
- Check whether the Steam Error code 130 still appearing or not.
Ways-2: Change Proxy Settings to Fix Steam Error Code 130 failed to load Web page in Windows 11/10
- Right click on Start button.
- Choose Run.
- Type inetcpl.cpl and press Ok button.
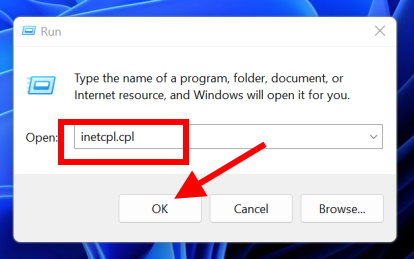
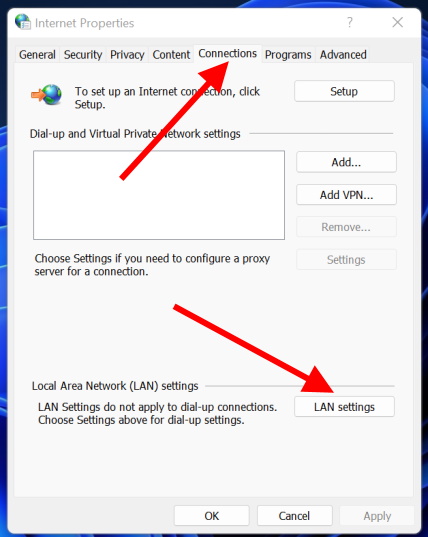
- Internet properties window will open now.
- Go to the Connections tab.
- Click on LAN Settings.
- Local Area Network Connection Settings window will open now.
- Uncheck all the boxes against both the options, Automatic configuration and Proxy Server.
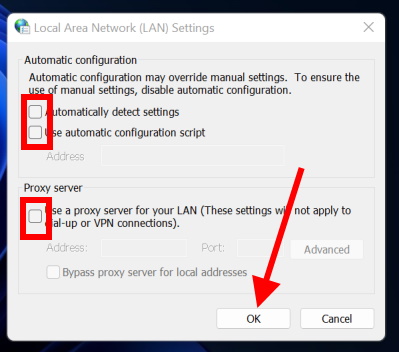
- At the end, click on Apply and then Ok button.
- Restart Steam gaming App.
Ways-3: Clear DNS Cache
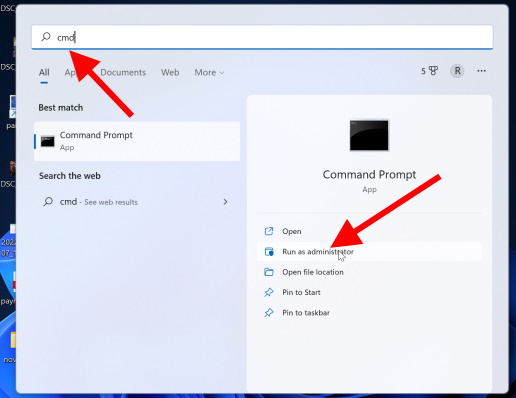
- Go to Window Search.
- Type cmd.
- Open Command Prompt Window as Administrator mode.
- Now execute the command ipconfig /flushdns and Press Enter.
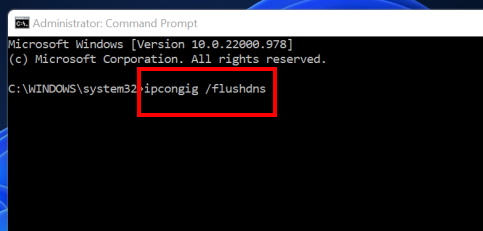
Windows will now clear all types of DNS Cache and your problem will also fixed.
Ways-4: Update Network Adapter Driver
- Right click on Start menu.
- Select Device manager from the context menu.
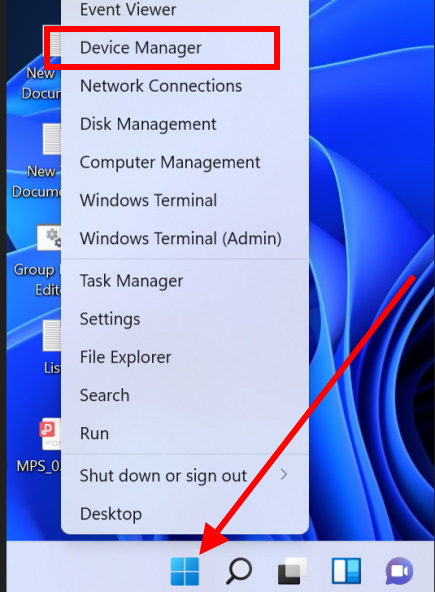
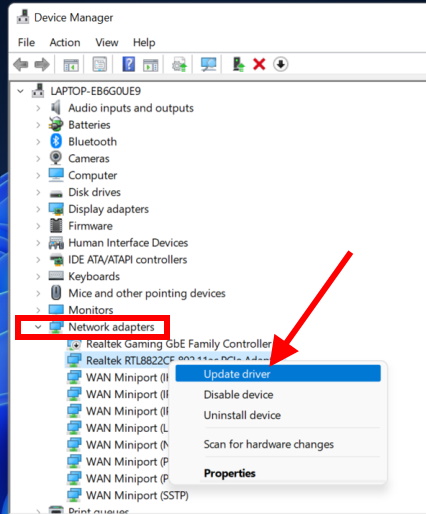
- In Device manager Window, Expand the Network Adapter section.
- Find out your Network adapter driver.
- Right click on It.
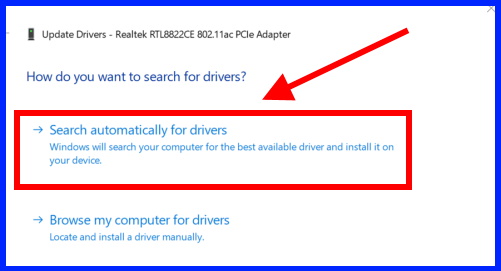
- Choose Update driver.
- Choose the first option as Search automatically for drivers.
- Let the window complete the updating process.
- Follow on-screen instruction.
Ways-5: Uninstall Third Party Programs to Fix Steam Error Code 130 failed to load Web page in Windows 11/10
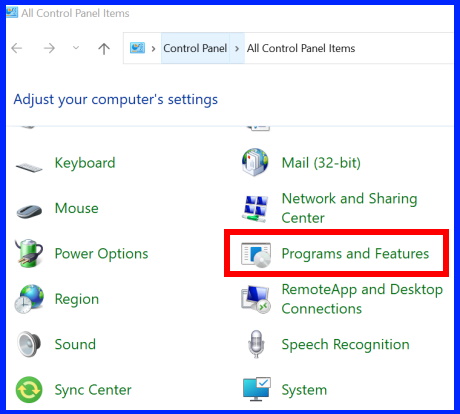
- Open Control Panel.
- Choose the option Programs and Features.
- Under Programs, find out third party antivirus installed in your system.
- Select it and apply a right click on it.
- Click Uninstall a program.
- Follow on-screen instruction.
- Restart your system, once uninstallation process is over.
Ways-6: Reinstall Fresh Steam Client
Create a Backup of Steam App
- Launch Steam App.
- From the menu, choose settings option.
- Go to the Download tab.
- From the right side, you will find the option Steam Library Folders.
- Click on it.
- It will bring you Steam Storage manager.
- You will have to choose a destination folder to install Steam app in Windows 11 PC.
- Usually it will auto select as Drive ‘C‘.
- Thereafter click on three dot from the top.
- Choose Browse folder.
- It will automatically directs you in File Explorer folder namely steamapps.
- You should here go back to the previous folder which already having steamapps folder.
- Copy this folder.
- Paste this folder to another new location where you want to install Steam App afresh.
- It will a backup of your Steam gaming App.
Uninstall Steam App
- Go to Windows Search.
- Type CP in it.
- Open Control Panel.
- Select Programs and Features option.
- Navigate the Steam app.
- Select it and click on Uninstall.
- Follow on-screen instruction till completion of uninstallation procedure.
You should also delete all its data from App Data folder.
Reinstall Steam App
- Go to Steam Official Web page.
- Download and install latest version of Steam App from here.
- Once download complete, go to its folder location.
- Run it.
- Complete the installation process.
- Create a desktop shortcut.
- Now apply a right click on Steam app desktop icon.
- Select open file location.
- Now copy the backup folder which you have created earlier.
- Paste it in new location.
- Restart your Windows 11 system.
That’s all.
